EASY TO FOLLOW DIY PROTON PACK
Make Your Own
Ghostbusters Proton Pack
You can make a Ghostbusters proton pack with items from around the house!
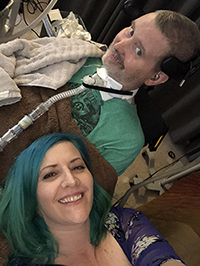
Ghostbusters came out in 1984. I was 10 at the time. I loved it so much and thought it was hilarious. I still think so. I loved it so much that in fifth grade I was a Ghostbuster for Halloween. I’ve always loved making my own costumes and I was so proud to have pulled off a Ghostbuster. Too bad I don’t have a picture!
When the movie was remade a couple of years ago with a female cast it seemed like the perfect time to do the costume again. I decided I’d be a Ghostbuster that Halloween and this time I stepped up my game and made my own proton pack. Here, I show you how I did it.
Wanna be a Ghostbuster for Halloween Too?
Great! The costume part is easy peasy. Some tan coveralls with a patch or two, some boots and voila! That also depends on which movie you’re looking to recreate. The one from ’84 or the remake in 2016. Costumes are also easy to find at places like Party City and on Amazon.
The proton pack is another story. It’s not hard and you can make it on quite the budget, but know that it’ll take some time and a good bit of patience. I created mine over three weekends. I enjoy making something like this from scratch, making it up as I go. I was quite proud of the finished product. The time it takes you will just depend on how quickly you work, how long you have for each working session, etc. I’m a perfectionist and sometimes spend too long on a task that isn’t a priority.
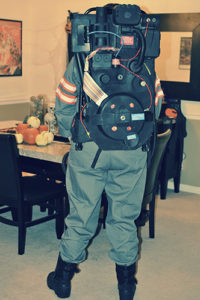
The finished product.
Ready to Make Your Own Proton Pack?!
Here’s how I made mine, mostly from things I already had at home. Hopefully this helps you with creating your own!
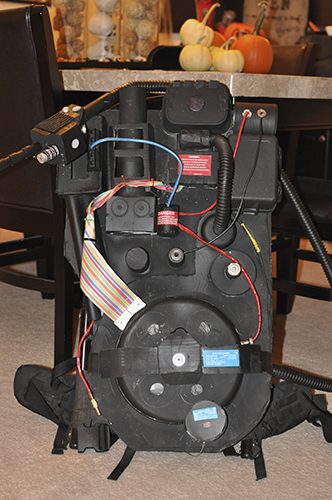
Let’s start with the goal. The picture below is the proton pack and that is the look you’re trying to achieve using things from around the house.
The goal!
Once I had the goal in mind I started by looking around online for DIY proton packs. I found a few helpful sites and some great looking homemade packs. This site was a great starter page for me. Start there then surf around for images that give you the best understanding of what you’re trying to create. I saved a few images to my computer and used them to reference while I worked.
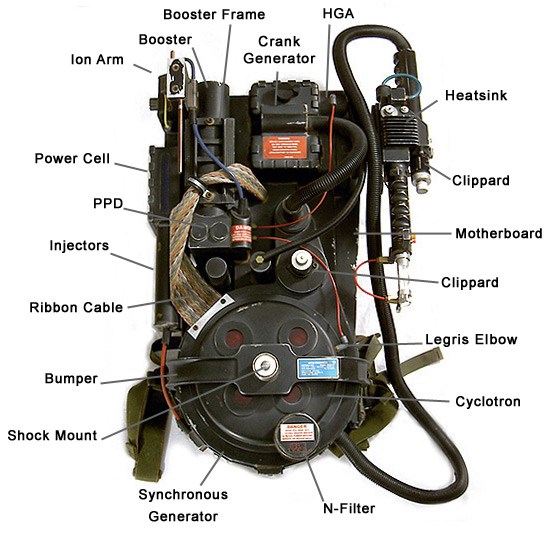
Below is the main image I referred to as I got started working to create the main shapes. My research showed that common dimensions for a pack are around 23 inches tall and 15 inches wide, 12 inches deep.
An online picture used for reference to begin building the main shapes. Click photo for site reference.
How Low Can You Go?
I like to challenge myself to see how cheap I can make costumes and props. Always start by looking for things around the house for anything that can be used. For this pack I was able to find most of the things I needed in the garage. Only a few things needed to be purchased.
I started with the base cardboard piece and added one thing at a time until it came together. Be sure to use a large, sturdy cardboard box for the base. Break down a box and ensure it’s sturdy enough to handle a few pounds of weight. As you can see, the bottom part of the pack is rounded. so the bottom two corners of the base were cut at angles. The cyclotron will go on top of that.
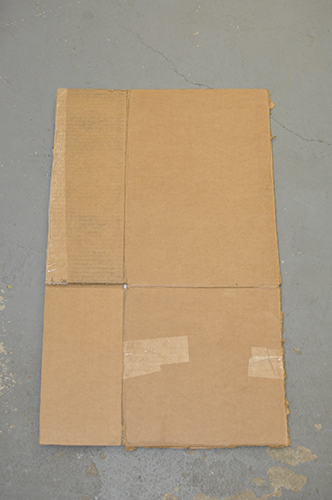
A broken down box used for the base.
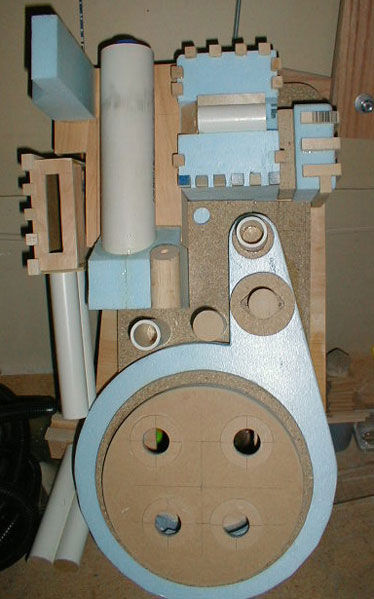
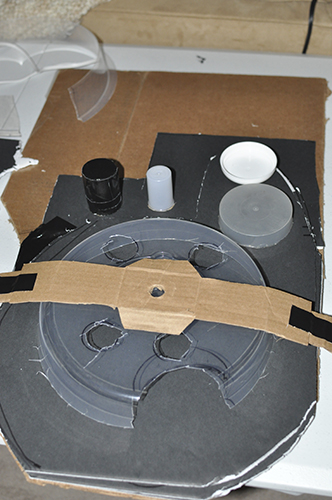
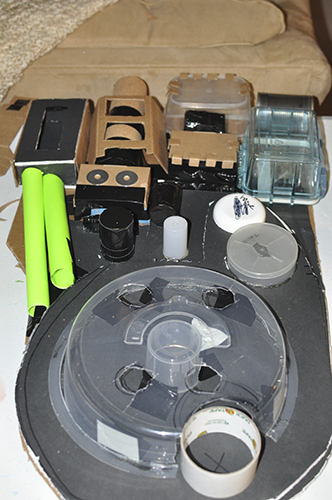
Using my reference photos above, I started placing household items onto the base to see how they would work as the shapes of the pack. Since I didn’t have anything that would work for the cyclotron yet I used hose to make a circle to take up that space on the bottom while placing items around it. This was just getting an idea of placement for things. And so it began…
After studying the online photo I began to gather objects from around the house to see how they looked on the background.
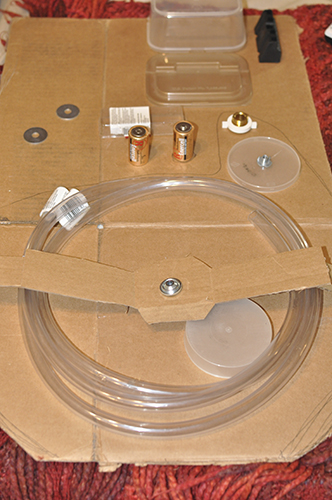
The garage is a great place to look around for items that will work for the proton pack. Washers and wires, tubes and containers all work to create the look of parts of the pack. Focus on shapes and sizes. Once everything is placed it will get a coat of black paint so colors aren’t a concern here, just use the items whose shapes work.
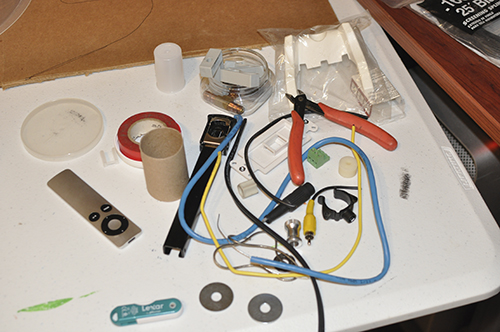
The garage or shed is a great place to start looking for items.
More items from around the house.
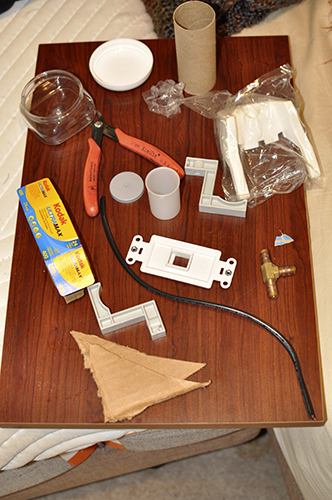
Hooray for the Dollar Store!
A cake storage container from the dollar store works perfectly for the cyclotron. This one was a bit tall so I did end up trimming it a bit to sit lower. Continue placing items to get a feel for how they will look. There’s a good bit of trial and error to get things to fit and look just right. Some items will work as they are and others will need cutting or altering in some way.
The good news is that the Dollar Store (Dollar Tree, Dollar General, you know, your stores with Dollar in their name) has aisles of different items that can work. Take a picture of your model with you and look around for the shapes and sizes of things that might work.
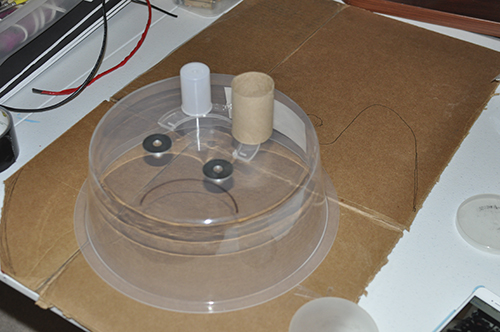
A cake container is perfect for the cyclotron part of the pack.
Always trying to use what I have around the house first, I stacked some black foam board and cut it to make the bottom shape of the pack. I stacked it simply because I didn’t have anything that thick. This also adds some dimension to the pack. Stacked cardboard could be used for this as well.
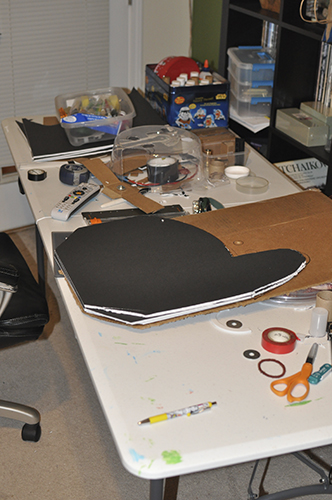
Black foam board was used to create the bottom part of the pack. This begins to create some depth and dimension to the pack.
Continue to cut and shape things while referring to pictures. Again, some things work and some don’t. Just keep trying, it will come together slowly but surely! At this point I had trimmed the cake container down, as well as cut holes in it, and also cut out the crescent shape at the bottom. Not an easy task cutting circles in plastic like that! I started by using a knife, pushing it down into the plastic in an “X” shape, then cutting the four little triangles out into the best circle I could! A box cutter might work well here too. Just be careful, please. We don’t need any missing digits! Need those fingers to shoot your ray gun!

I went between a few different photos online as I worked on shaping things up.
Lots of trial and error, trying different things to see how they look.
It’s Going to Get Messy
Setting up a folding table is what works for me. Plenty of space to work and set tools and supplies. This table was in my living room for three weeks. As someone with OCD it’s really hard to have such a messy area in my house for awhile but I know it’s for the sake of the project! And luckily my husband didn’t mind. I spent three Saturdays watching football and movies while making this.
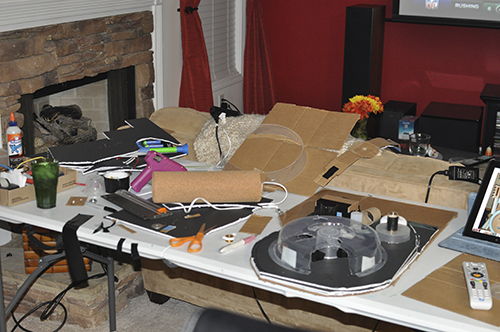
It’s not easy having such a mess around the house for three weeks. I like things tidy and this conflicts with my OCD. I’m forever learning to enjoy the process. Creativity is messy!
Like I said before, shapes are the main priority since everything will be painted black. Still, I used black duct tape where I could anyway. Duct tape is such a great thing.

Save paper rolls for a couple of weeks. They are great for projects like this!
Think Outside the Box while Using the Box
So much of the way this is done is about getting creative. Don’t have what you need? Try to find a way to make it yourself! Cardboard is easy to cut and tape. In the picture below you can see I used a roll of cork board for the upper left tubing. I just didn’t have a tube the right size and that material was flexible and still sturdy enough so that’s what was used.
You can also see that under the plastic box is some more cork board, along with some card board that was cut to make the next rectangular box. Cardboard is great here! It’s ‘free’ if you’ve had any recent deliveries, it’s sturdy, and it can be cut to any shape!
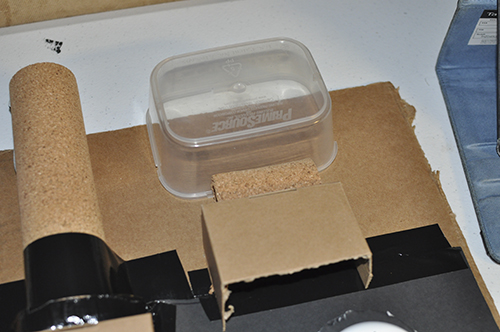
Storage or lunch meat containers, cardboard and cork board worked for some of the top shapes.
In order to get just the right size and shape here I cut a box into several rectangles and stacked them.
Here you can see things really coming together! I used either black duct tape or a glue gun to attach items to the base. For the most part the shapes are plastic, cardboard, cork board and poster board.
It starts to really get fun when you can see a light at the end of the tunnel!
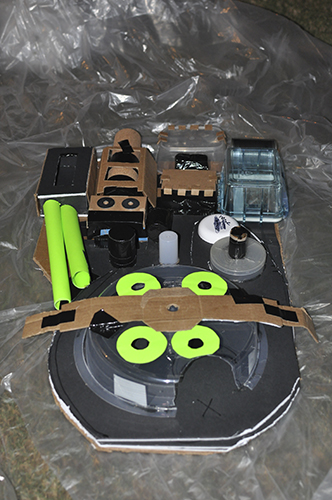
It’s little things that will set this pack apart from the rest. Keep eyeballing it to see what detail you can add. The green circles add more of a finished look to the holes in the cake container.
Paint It Black
Once I was satisfied with all of the shapes I covered the whole thing with black spray paint. I did three light coats of black matte, letting each one dry for an hour between coats.
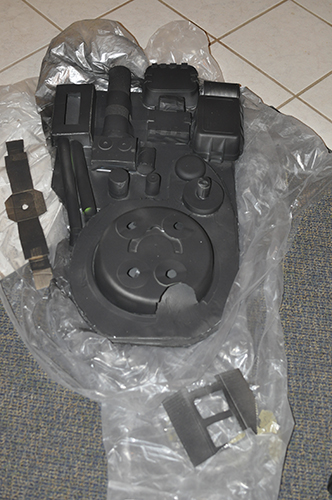
Once all the shapes have been prepared, paint that baby solid matte black!
Drying in the setting Autumn sun.
Light it Up
This is where things really start to get exciting. Time for the lights! I used a strand of red battery powered holiday lights. The goal is to arrange the lights all through the area of the cyclotron. Once the lights are arranged, bring the wire neatly out of that area, then wrap it around to the back of the back. Attach the battery pack to the back of the pack. I used velcro to attach it to the back.
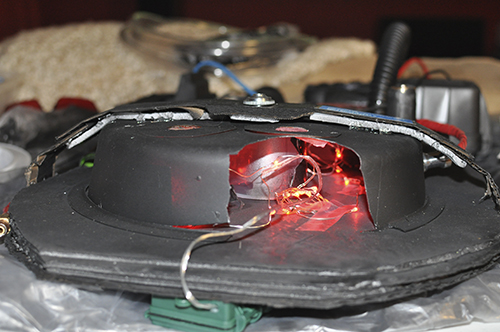
The lights make the pack that much more impressive!
You can use whatever you prefer to attach things to the pack. Just be sure it’s going to hold. I like a glue gun for a lot of it. Super glue works and again, duct tape works wonders.
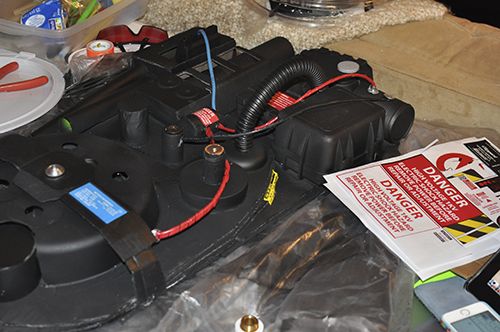
Hoses and Wires
The top right of the pack features a short hose that comes out of it, bends like a rainbow shape, and goes back into the pack. We have a lot of respiratory supplies at our house so I had plenty of tubing I could use. This can be found at a home improvement store as well. You’ll just need a foot or so, and spray paint it black. I used a glue gun to secure both ends to the pack.
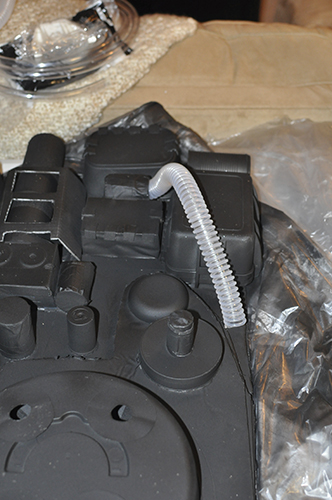
Tubing is used to run from one part of the pack to another.
The pack has several wires running here and there on it. I used old speaker wire or audio cable for that.
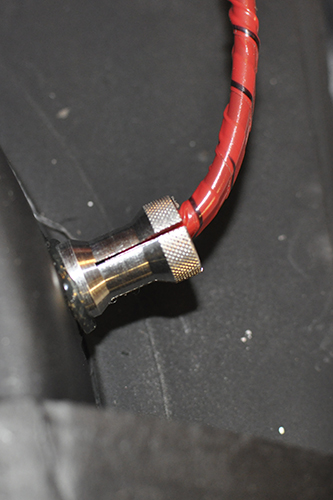
An old black wire, wrapped in red electrical tape, hot glued into a random silver piece of hardware, then glued to the pack.
If gluing the wire to a shape that can be cut, make a little hole and put the wire in it slightly, then carefully glue around it.
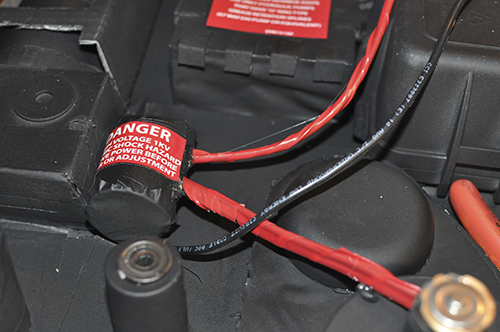
Proton packs have some warning signs and labels. I did several google image searches until I found ones that looked just like the ones in the movies, as well as those that had a good resolution for printing. I just printed them out in color on regular white paper, then glued them on with clear craft glue.
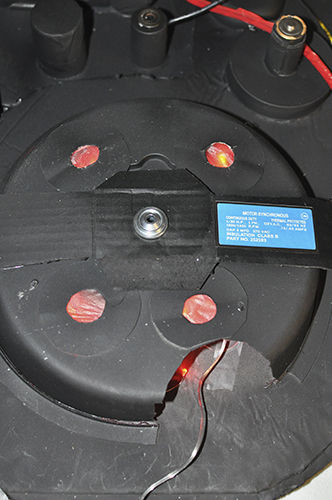
Look for the labels online. Print on regular paper and glue them to the pack.
How about a hand for Google images, ladies and gentlemen. Google images! Before that you had to find the right fonts and design things yourself.
Looking for other Halloween costume ideas? We’ve got posts on the Marvelous Mrs. Maisel, Beverly Goldberg, and Alabama Worley!
The Devil’s in the Details
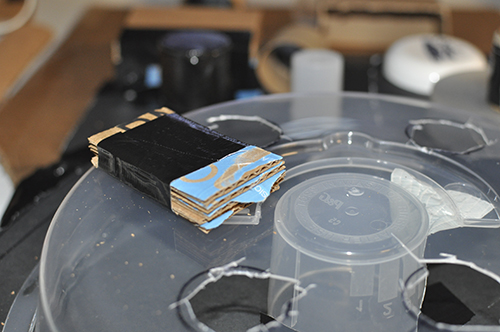
The ribbon cable is another thing that can set your pack apart. Finding an old ribbon cable at a thrift store would be great, but if you can’t find one it can be made.
I made a long strip of white paper for the base, then attached thin strips of construction paper to it with glue. Be sure to make the construction paper strips about twice as long as the white paper strip. Let them hang off the end. Those get bundled and twisted together.
First, complete the bottom part of the ribbon cable. I used clear packing tape to secure it all together and make it a bit sturdier. At the bottom of the cable, I used two pieces of cardboard to finish the edge.
I glued the cardboard to the cyclotron then wrapped it up to the top and glued those ends there. Along the way I wrapped a few zip ties around it, which also helps neaten the cables at the top.
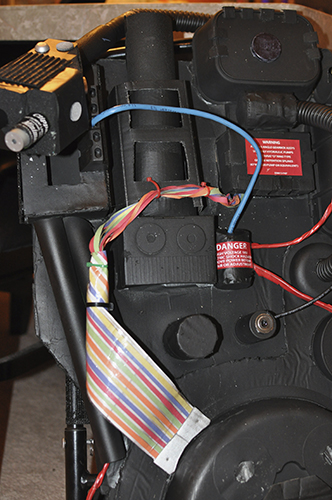
The ribbon cable was made from construction paper cut into thin strips.
Luckily, I had an old backcountry pack that could spare its frame. It’s from an old Kelty 3-Day Pack and was perfect for this project. I used zip ties and duct tape to secure it to the frame. You should be able to find an old hiking pack on a used site like ebay, or maybe an outdoorsy friend has one they could lend.
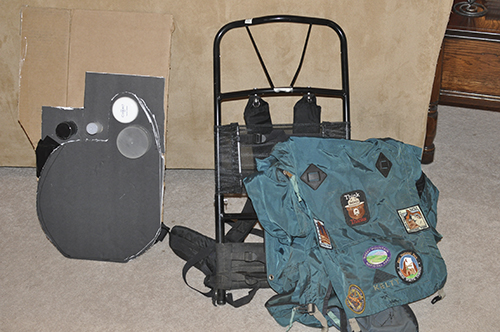
An old backcountry pack frame happened to work perfectly.
The Elusive Ray Gun
Another piece of respiratory tubing was used for the elusive ray gun. It’s not really elusive, it’s just that I didn’t get a lot of good pictures of this part of the project. Oops. I glued the tubing to the bottom right of the pack. It should be long enough to come up and around your front while wearing the pack.
I used cardboard and Styrofoam to make the apparatus shape at the end of the tube, then used a rubber tube for the tip. That tube for the tip is clear and wrapped in black and white electrical tape. So much of this is about getting creative and using what you have to recreate the shapes and textures you see in the model you’re using.
For example, in the photo below, the top part of the gun, under the two grey circles, is from a cardboard box. I peeled the paper from one of the sides of a box and voila. The corrugation gives it that look of ridges. Little things like that will really make your prop pop.
The gun was made from a foam block and some rubber tubing.
Keep working at it, trying different items in different ways, and making it look like the pictures that you’re using as your guides. The more detail and the more TLC you give your project, the better it will be in the end. I see so many things I’d like to have done better on mine, but I’m also so proud of what I created, using almost everything from just around our house.
Looking for other Halloween costume ideas? We’ve got posts on the Marvelous Mrs. Maisel, Beverly Goldberg, and Alabama Worley!
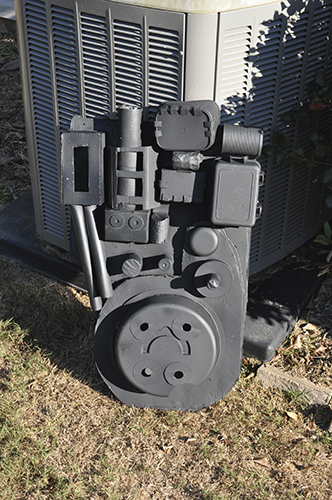
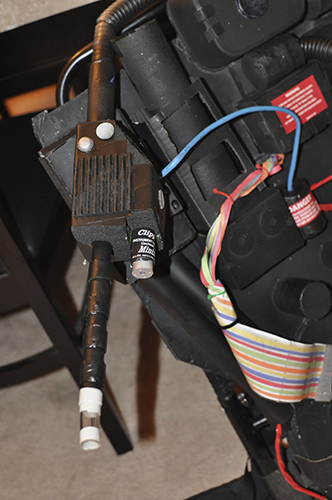
The Final Product!
The final product!
Time is One Thing. Show Me the Money.
That’s how I made it. Now let’s see how much it cost. Since I was able to find almost every item from around my house, mine cost practically nothing. If you don’t have these items, ask friends and family if they do. Or look at thrift stores and flea markets for things that will work just right.
I’m going to breakdown the items used and provide an estimate of the cost if all items had to be purchased. I use estimates assuming that most items are purchased at the Dollar Store, on Amazon or at Target. Nothing fancy. I bet you have most of these things, or other things that will work, around your place too. This should be a high end estimate.
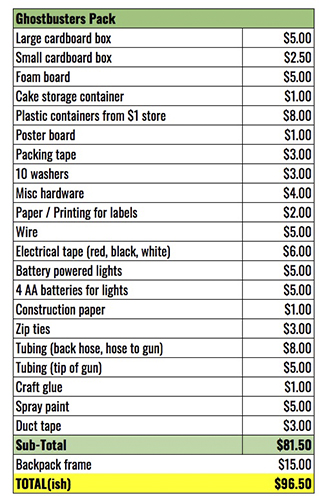
Try the Dollar Store first. The majority of items needed can be found there. Keep an open mind. Look at shapes of items first.
The main thing that will vary the cost is the backpack frame. Consider other options for the frame if you can’t find something like what is shown here. A regular backpack might work just fine. Like I said, get creative! The more creative you are, the prouder you will feel. Plus, it’s just fun!
So there you have it. A proton pack on a budget. Something you can take pride in. Not only that, but you might make a little money too! I spent less than $20 making my pack and ended up selling it on ebay for $220. Not too shabby!
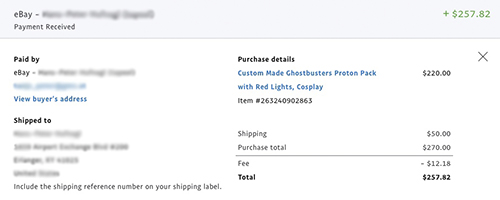
The pack sold on ebay for $220!